View this release
Alternative links
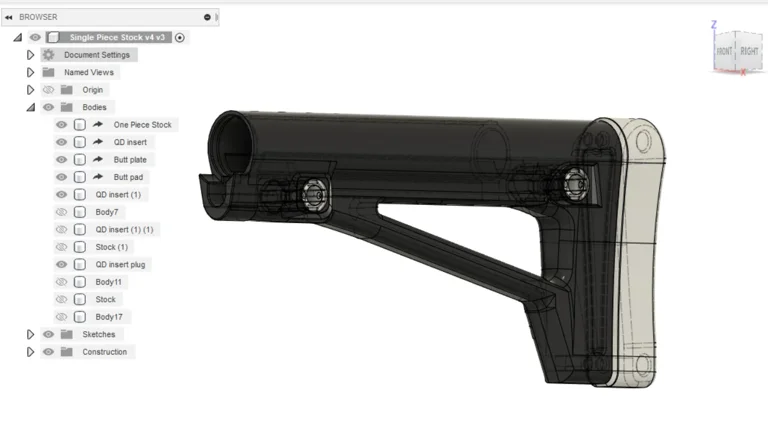
This ar15 stock design is intended for mil-spec carbine buffer tubes. I was in search of a light-weight fixed stock and found that the Magpul MOE carbine stock has too-short of a length of pull, even with the extra thick butt pad.
This design is based around a choose-your-own-thickness butt pad to get the LOP that you want. Two widths of butt pad are included in this set of files, a 12mm and 25mm version, however, it is trivial to adjust the butt-pad model to the exact thickness you desire.
A lot of credit should go to Laffs Dynamics (FFFTech/FFFTechnology), as this stock design started with the Urban Explorer as the base 3d model and was modified from there.
https://odysee.com/@FFFTech:3/Urban-Explorer-Carbine-Stock:b
I also wanted the stock to have QD sling mount options, so it has been designed with replaceable QD adapter cups a la the Magpul MOE/PRS light stocks. I made the QD cup sockets compatible with the same QD inserts that work with the Magpul MOE stock; however, the 3d models for printable QD inserts and plugs are included.
To secure the stock, i've used the printable QD insert design as the fastener to lock the stock onto the buffer tube. The QD insert plug included here is intended to use one of the M5 threaded metal inserts from CNC kitchen, both the regular and short versions of the 5M threaded inserts should work:
https://cnckitchen.store/products/gewindeeinsatz-threaded-insert-m5-standard-50stk-pcs?pr_prod_strat=copurchase&pr_rec_id=c293ff700&pr_rec_pid=7770277708015&pr_ref_pid=7770271318255&pr_seq=uniform
https://cnckitchen.store/products/gewindeeinsatz-threaded-insert-m5-short-50-stk-pcs?pr_prod_strat=use_description&pr_rec_id=e4ce0e50e&pr_rec_pid=7770271318255&pr_ref_pid=7754948247791&pr_seq=uniform
The butt pad is fixed to the stock using the short M5 threaded insert.
Alternatively, you could modify the QD insert plug model and stock with M5-0.8 threads directly into the printed part and forego the metal inserts. The world's your oyster with 3 printing.
I've prototyped the stock with both Polymaker Polylite PLA pro and Polymaker polymide PA6-GF filament. I use PA6-GF for the QD insert and plug. I print the butt plate in PLA pro and the butt pad in TPU95. I use a 0.6 mm tungsten carbine nozzle for use with the abrasive fiber-filled filaments, so all of my testing has been done with 0.6 mm line widths and either 0.2 or 0.16 mm layer heights.
The stock should be printed with the butt-end down, and I don't use any supports. I print the QD insert and QD insert plug with the small diameter end down, with the rim printed as overhang, no supports. The butt plate and butt pad are printed in one session, with the butt plate on the bottom, with supports, and the butt pad on top. I use cura's post-processing to insert an pause for filament change at 4.6 mm height, and use the settings change at height 4.6 to use adjust the retraction distance for TPU.
The PLA pro and TPU95 are printed at 220*C. The PA6-GF is printed at 290-300*C. Bed temperature is 40*C for all prints.
I'm using a Creality Ender-3 S1 Pro with a 0.6 Tungsten Carbine V6 nozzel from 3DMakerEngineering.
Walls are printed 3 layers thick on the stock and QD inserts (1.8mm), 6 layers top and bottom (1.2 mm). I'm using 20% gyroid infill on PLA prints and 16% gyroid infill with PA6 (nylon) prints. I set my infill line width to 0.4 mm to get a higher line density of infill for the same infill percentage. I also connect infill lines and alternate extra wall.
For the butt plate, the part is thin, so there shouldn't be any actual infill, but you would want 100% fill if you adjust settings. The butt pad is printed in TPU with 1 wall of TPU, 2 bottom layers, 6 top layers, and 10% gyroid density. The butt plate and butt pad are printed at once, so i'm using Cura's Per Model Settings and the post processing extension to adjust between the PLA settings for the butt plate and the TPU settings for the butt pad.
To have a complete stock with printed QD inserts you will need:
Qty 4 M5 threaded metal inserts
Qty 4 M5 screws
You need to print
Qty 2 QD inserts
Qty 2 QD insert plugs
Qty 1 Butt plate + Butt Pad (butt pad thickness of choice)
Qty 1 Stock
After print the stock, install 2 of the threaded metal inserts into the holes on the butt end of the stock. After printing the insert plugs, install 1 metal insert into each.
slide the Stock over the buffer tube and snug it up to the castle nut and end plate. Watch for the threads catching and preventing the stock from sliding flush, remove and chamfer if necessary.
If you are right-handed, then the QD inserts go into the left side of the stock, with the insert plugs opposite on the right. Use M5 screws to secure the QD inserts and plugs, sandwiching the stock.
Finally, use the remaining M5 screws to fix the butt plate+pad to the butt-end of the stock.
Enjoy!
LBRY Tags: 3d printing; buttstock; carbine; stock