View this release
Alternative links
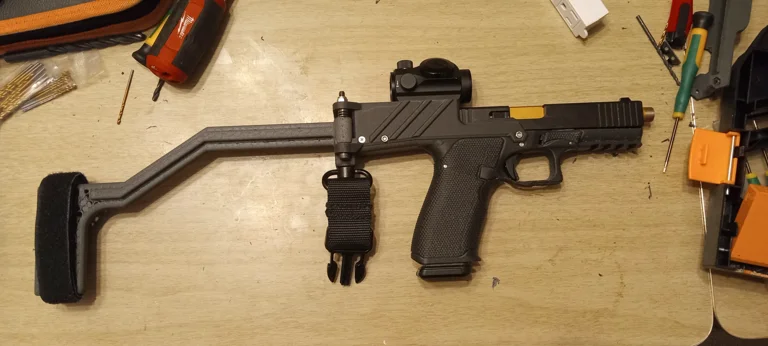
G17/19 USW - Remix^2. Remember to 1 point sling carry with a trigger cover/holster, or unload after use. That is, unless you like shooting your dick off.
Original Remix by BooliganCustomGunworks
Original model developed by chairmanwon
Go ahead. Bust my chops on not including everthing. Go find it yourself if you must. I'm not trying to pass my work off as someone elses. Just some mods and fixes to make this the firearm I wanted. Someone else might want it, too.
This frame is designed to emulate the shape and functionality of the B&T USW but in a printable Glock 17/19 pattern gun. I've included a merged chairmanwon g17 v3 frame as an example. You do you, boo. As long as it's a G17/19 variant and identical in the rear trigger pocket, it'll work.
Updates/Fixes I added:
1: Slide release area expanded for more/extended releases
2: Top of open mount is lowered and pulled back to clear slide attached optics.
3: Left AND right side folding options. If you single point sling this, you may find a right folder is less likely to tangle.
4: Brace re-profiled(less hand interference in closed position), ribbed for strength, and lengthened (for G17 if you so desire).
5: sling area 1/2 filled in and a really close spec QD sling mount added. I love it for using a 1-point sling, no brace, and pushing forward against the sling. MP5 folks used to do it that way and it works to stabilize. So if you're stressing over 3/31/2023 pistol brace ruling being enforced, do the 1-point sling trick and use no brace/stock.
I really intended the chairmanwon frame to just be an example of how a glock family frame could be used with the beavertail to get you whatever frame as a USW. Follow the base readme included in the Chairmanwon g17 V3(or 19..Same pin distances) build info, but for specifics on this:
Included is the beavertail from the original Booligan release. Chopped out of the FDMA frame. ADD it to any frame STL you want to. Align and match up the features on the beavertail to the features on whatever frame you pick.
Things to watch for: align so both sit flat, rails down, at same level. Then tweak the X/Y/Z match. However. The frame should take priority. Make it so the frame, by about 0.03mm, overshoots the surfaces of the beavertail.
If you can convert meshes to solids, because you've got a big brain, Fusion360 it up and match/center the surfaces. I have to compensate for a small brain, with big dollars in Fusion360 subscription that will convert meshes without crashing. But I don't have the money, so here we are...grafting it together.
For supplemental hardware, you will need:
1. All Gen 3 G17 spec parts as highlighted in the original Chairmanwon G17 v3 files.
2. G17 length magazine.
3. 3 x M3-35 screws with accompanying M3 nuts - screws SHOULD be flat head countersunk, however, other formats will work if you can't find them. You can also use a non-metric equivalent, but I can't guarantee fitment in the countersunk spots or the nut housings. These screws attach the rear mount to the frame, with the front one replacing the upper pin for the locking block.
4. Hinge hardware - M5 hole. Use what you can find. Standoffs. Clevis pin. Carbon fiber tube epoxied in place. Get creative. I changed the hole size. Because a Glock needs metric. Ender 3 factory bed spring(What a great idea, Booligan!).
Print the frame rails down. Use thick tree support. X/Y support distance 1.3mm. Can't stress this enough. The Chairmanwon frame requires it or you'll end up with a terrible support mess on the grips. Most important: clean up your trigger guard area. Come on....It's so good, but leaves just one messy spot. Clean it up.
Print the rear mount with the top face to the bed. Not at all like the original reccomendation. Reason: Print layer strength and stuff. Use Tree supports. Use thick trees in PrusaSlicer (Yes, the latest version has tree suport)
Print the brace arm flat.
SCREW your PLA+. Go to some form of Nylon12 or Nylon11 with carbon fiber or glass fill. It's time to leave 2020. Upgrayedd. Put a $60 enclosure around your Ender 3 v2. Upgrayedd the hotend to double direct drive and 300c temp for $80. Go to Klipper. Install an accelerometer. You _can_ get bamboolabs results on Creality hardware.
This project is published under the MIT License