The Super Patriot PDW: Blank Series STEP Pack
The goal of this project is to bring a comfortable and customizable frame/chassis system to the people, one that can satisfy as many needs as possible while still taking a beating when printed in PLA. With minimal support, it prints in just under 13 hours at just under 250 grams, giving you three frames and accessories of your choice, or 4 frames per 1-kilogram spool in just over 2 days on average.
I bit off more than I could chew on this one, in terms of variety. I will be doing a Print Orientation Ready, stippled pack for these, but it's a lot of models to get through. I'm dropping this for you to edit to your liking. It is designed to easily create your own stippling or theme by extruding Patterns or SVG images into the Uncut Stipple Tool body. Maybe one of the stipple gods will bless us with a remix.
Due to the sheer number of variants, the individual frame files are grouped in series. 5 total series for FMDA at 9 Frames per Series. 3 total series for G120R at 3 frames per series. I was not willing to make compensator nose versions of the SP-G120, so the Order in variation differs slightly. Series 5 FMDA and Series 3 G120 are the same, so I called it Duty Series to have the two platforms match in name. I definitely won't be doing this many versions of a build in the future.
FMDA
Series 1: Five-degree offset butt picatinny, compensator/G34 length tip.
Series 2: Zero-degree offset butt picatinny, suppressor cut to slide specification.
Series 3: Five-degree offset butt picatinny, compensator/G34 length tip.
Series 4: Zero-degree offset butt picatinny, suppressor cut to slide specification.
Duty Series: Five-degree offset butt picatinny, suppressor cut to slide specification, optic mount geometry removed.
G0 - G80 - G120R
Series 1: Five-degree offset butt picatinny, suppressor cut to G19 slide length
Series 2: Zero-degree offset butt picatinny, suppressor cut to G19 slide length
Duty Series: Five-degree offset butt picatinny, suppressor cut to g19 slide length, optic mount geometry removed.
Accessories:
-Right, Left, and Ambidextrous RMR Charging Handle
-Notched RMR plate compatible.
-Short Top Optic Mount
-Must Remove Iron sights
-Works with RMR Charging Handle
-Irons Height Optic Mount
-Side Panel Optic Mount Topless Covers
Hardware:
-(x2) -M3 x 30mm Socket Head Screw:
https://www.homedepot.com/p/M3-5-x-30-mm-Metric-Socket-Head-Cap-Screw-2-Pack-844508/204283593
-(x2) -M3 Locking Nut:
https://www.homedepot.com/p/M3-0-50-Metric-Grade-A2-70-Stainless-Steel-Machine-Screw-Hex-Nuts-25-Pack-9120286/310493710
-(x1) Extra Mag Release Lever
-(x1) Extra Mag Release Spring
-Long pins work great for the front locking block.
-Roll pins are also recommended.
-Only use metal pins.
Dev-Tool Orientation:
-Not print orientation ready.
-Blank frame Bodies for modifying and/or custom stippling.
-(Uncut) Stipple-Cavity Cut-Tool Bodies (Creates a .5mm perimeter around stipple)
-(Uncombined) Stippling Combine-Tool Bodies (These bodies become stippled texture that combine to frame/chassis)
-To save data, you will have to insert the Top Rails and RMR Charging Handles as components into whatever series you choose.
Printer Settings:
-Avg Print Time: 13hr
-Print Frame/Chassis upside down
-Print Optic Mount on their rear face, side panels upside down(aesthetic) or on the flat side(Strength).
-Print RMR Charging Handle on the bottom face
-IMPORTANT-Bottom Shell Thickness: 6mm
-12 wall loops
-66% gyroid infill
-Tree Supports
-Paint supports on optic mount cavity overhangs
-No Fuzzy skin on optic mounting models, unless you glue and solder the mount to the frame and sand the Optic Mount Locking Tabs.
-Fuzzy Skin: Contour
-Fuzzy Skin Point Distance: .05mm
-Fuzzy Skin Thickness: .05mm
Features:
-Sling-driven PDW
-Direct mount front sling point, right or left side.
-Blue Force gear U-loop for rear sling point, ambidextrous.
-Swappable Optic Mounts.
-1913 Optic Mounts
-Slide Height Optic Rail
-Irons Height Optic Rail
-Side Panels for slide-mounted red dot.
-Front mag-well notched for TLR-H1. May need to trim flashlight tabs for certain models.
-Notched rear trigger housing wall
-Enlarged baseplate friendly
-Exposed Baseplate when slide locked back
-Suppressor Cut Frames/Chassis for use with a 46mm outer-diameter suppressor and under
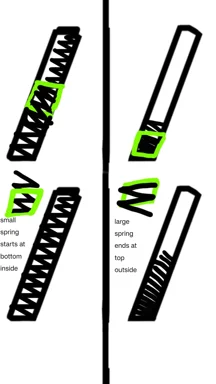
-Gen.5 Take-down spring
-Compensator Nose Built Frames are G34 Length
-Super Patriot G120 chassis' are cut for a Gen.4 slide recoil spring. If the gapping bothers you, print or buy a strike
https://www.midwayusa.com/product/1022710824?pid=531093
-I haven't run a Gen4 slide yet, but you're more than welcome to give it a shot.
-G19 slide only: Blast Forward Pack.
-Hardware:
-(x1) -M3 x 30mm Socket Head Screw
-(x1) -M3 Locking Nut
Open the Read Me file within the download.
Don't print this without reading, please.
Rate accordingly. Bless you all.
LBRY Tags: dev-tool; pdw; fmda; glock gen3; g120r


Unseenkiller - Recession Ruger R3
Unseenkiller - Block Slim - 43X and 48

Glock PMAG 9mm Magazine Baseplate