View this release
Alternative links
I have found that the Colt / Glock AR9 BCG sold at Right To Bear makes an excellent fit for the Bobcat build, and very reasonably priced.
https://www.righttobear.com/ar-9-9mm-bcg-1-2x28-barrel-choose-size/
The cut for the key is flat and the included key prints drop right in, the "ears" do not need to be ground, and the roll pin that holds the tail is drilled at an oblique angle that does not interfere with the path of the rollers. Make sure you don't get an "Enhanced BCG", as the roll pin is aligned and you'll have to do extra work to make it functional. The rack number for the correct BCG is A46, and the rack number for the Enhanced BCG (that you want to avoid) is E112. I know because I accidentally got one of each, and they gracefully replaced the Enhanced one with a standard one. The one included in the link above is the correct one.
Although the tolerances required for the BCG modification are very loose and it has been done very successfully with a freehand Dremel, I have designed this drilling jig to help builders with OCD, like myself, make the cuts more accurately and repeatably.
Instructions:
Print the jig with the spline for the AR buffer retainer at the bottom. The jig is designed to be self-supporting when using a .6mm nozzle in a P1S. I don't know if a .4mm will still keep it self-supporting or not. I used Polymaker PA6-GF and used the S3igu2 guide (linked below) on printing Polymaker PA6-CF for settings. I think I used 3 wall loops. PLA+ may work, but I didn't want to deal with any shifts in the jig as the cutter heats up. It's probably not an issue, but this whole project is overkill, so I'm owning it.
https://odysee.com/@S3igu2:c/X1C-Polymaker-PA6-CF-Settings:8
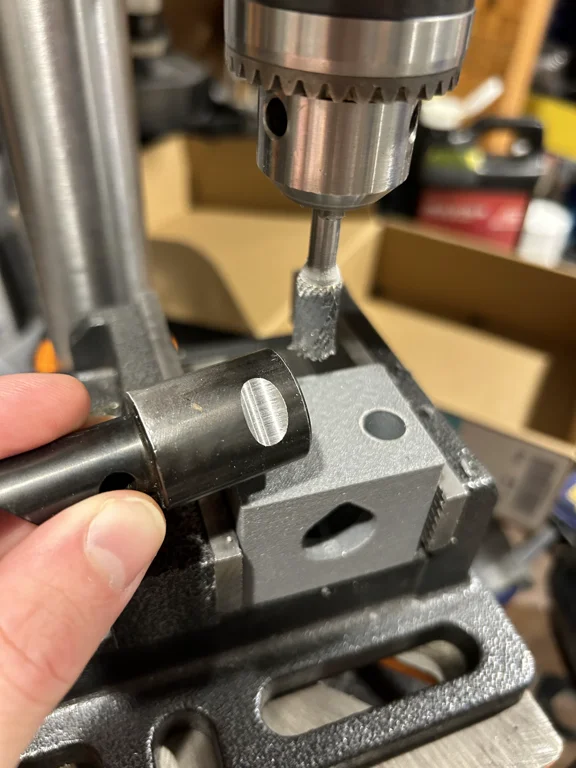
Once the jig is printed, put it in a vise on your drill press, and run the burr linked below through the holes to clean them up. Be careful to set the stops on your drill press so that you don't allow you to push the burr into the table.
https://a.co/d/a7uaXfK
Now remove the tail from your BCG by hammering out the roll pin. Press or hammer that tail into the jig until the rear of the tail is fully seated against the step in the jig. Make sure the spline on the bottom aligns with the cut in the tail. I designed this to be a light press-fit to the BCGs sold on RTB. I rest the front of the BCG tail on a piece of scrap wooden 2x4, and then lightly tap the rear of the jig onto it with a rubber mallet until it's fully seated.
Once you've verified that the BCG tail is fully seated into the jig, you're ready to start drilling. Make sure your burr is tightened securely into the chuck and use cutting oil. I ran it at 750 rpms and went pretty slowly, stopping periodically to add oil to the cutting surface. You should not need to clear chips, as I left the bottom of the jig windowed so they can fall straight through to your vise or table, and the burr produces dusty, powdery residue rather than proper chips.
My cuts came out nicely aligned and the distance between them was .781" (spec was .787", so adjust the STEP if you feel the need to).
Use a non-marring thing to push the tail out of the jig. I set the jig on top of my vise (with protective non-marring jaws on) and hammered it out from the top by tapping on a piece of scrap wood, but you can use anything that won't mar the surface.
I hit the surfaces with a polishing wheel and then cold-blued them with some Oxpho-Blue. After that, neutralized as per the instructions, and reassemble the tail onto the BCG.
https://www.righttobear.com/ar-9-9mm-bcg-1-2x28-barrel-choose-size/
The cut for the key is flat and the included key prints drop right in, the "ears" do not need to be ground, and the roll pin that holds the tail is drilled at an oblique angle that does not interfere with the path of the rollers. Make sure you don't get an "Enhanced BCG", as the roll pin is aligned and you'll have to do extra work to make it functional. The rack number for the correct BCG is A46, and the rack number for the Enhanced BCG (that you want to avoid) is E112. I know because I accidentally got one of each, and they gracefully replaced the Enhanced one with a standard one. The one included in the link above is the correct one.
Although the tolerances required for the BCG modification are very loose and it has been done very successfully with a freehand Dremel, I have designed this drilling jig to help builders with OCD, like myself, make the cuts more accurately and repeatably.
Instructions:
Print the jig with the spline for the AR buffer retainer at the bottom. The jig is designed to be self-supporting when using a .6mm nozzle in a P1S. I don't know if a .4mm will still keep it self-supporting or not. I used Polymaker PA6-GF and used the S3igu2 guide (linked below) on printing Polymaker PA6-CF for settings. I think I used 3 wall loops. PLA+ may work, but I didn't want to deal with any shifts in the jig as the cutter heats up. It's probably not an issue, but this whole project is overkill, so I'm owning it.
https://odysee.com/@S3igu2:c/X1C-Polymaker-PA6-CF-Settings:8
Once the jig is printed, put it in a vise on your drill press, and run the burr linked below through the holes to clean them up. Be careful to set the stops on your drill press so that you don't allow you to push the burr into the table.
https://a.co/d/a7uaXfK
Now remove the tail from your BCG by hammering out the roll pin. Press or hammer that tail into the jig until the rear of the tail is fully seated against the step in the jig. Make sure the spline on the bottom aligns with the cut in the tail. I designed this to be a light press-fit to the BCGs sold on RTB. I rest the front of the BCG tail on a piece of scrap wooden 2x4, and then lightly tap the rear of the jig onto it with a rubber mallet until it's fully seated.
Once you've verified that the BCG tail is fully seated into the jig, you're ready to start drilling. Make sure your burr is tightened securely into the chuck and use cutting oil. I ran it at 750 rpms and went pretty slowly, stopping periodically to add oil to the cutting surface. You should not need to clear chips, as I left the bottom of the jig windowed so they can fall straight through to your vise or table, and the burr produces dusty, powdery residue rather than proper chips.
My cuts came out nicely aligned and the distance between them was .781" (spec was .787", so adjust the STEP if you feel the need to).
Use a non-marring thing to push the tail out of the jig. I set the jig on top of my vise (with protective non-marring jaws on) and hammered it out from the top by tapping on a piece of scrap wood, but you can use anything that won't mar the surface.
I hit the surfaces with a polishing wheel and then cold-blued them with some Oxpho-Blue. After that, neutralized as per the instructions, and reassemble the tail onto the BCG.